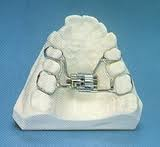
The Rapid Maxillary Expansion Appliance (RMEA) is a glued in appliance usually attached to four back teeth and used to widen the upper jaw so that the upper teeth fit properly with the lower jaw and teeth. These are usually in place for several months.
Instructions
- Avoid eating hard or sticky foods such as licorice, gum, toffee, hard candies, ice cubes, etc. These can loosen or damage the appliance. Apples and raw vegetables such as carrots must be cut into small pieces before eating as they can also distort the bands and wires, or cause the appliance to come loose.
- As soon as you have finished eating, carefully brush your teeth and the appliance. Make sure that you clean under the appliance as well as you can.
- To turn the appliance, place the key into the hole of the appliance on the roof of your mouth. Push the key to the back of your mouth until you see the next hole appear. Remove the key. It is very important that you push the key to the back until the next hole appears. Turn the appliance according to the schedule given at your latest appointment. (Do not turn from back to front as this will move the teeth in the opposite direction)
- Your next appointment should be made in one week unless otherwise instructed. At your next appointment, we will let you know if you should continue turning the appliance or if enough expansion has been achieved.
Important: If for some reason you do not return to our office for your scheduled appointment, stop turning the appliance until you see the doctor again.
- Check your appliance daily for loose bands or broken attachments. If you find any, stop turning the appliance and please call our office immediately.
Things you may notice
- Eating will be difficult at first. Be patient and eat soft foods and in a few days you will be able to eat more foods. You may notice that you tend to salivate more than usual, but this is temporary.
- There may be a metallic taste, sometimes noticed with a new appliance. This disappears in a day or two.
- With the appliance in place, your speech will probably be completely normal in two or three days. Reading aloud to yourself can help you become more quickly accustomed to its presence.
- A gap will open between your two top front teeth; this is normal and expected. The teeth that the appliance is attached to may also be sore for the first three or four days. Some soreness may also be experienced in the roof of your mouth and into the nasal region.
If you have any questions or concerns, please do not hesitate to contact our office.
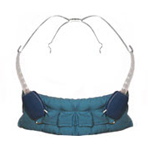
Headgear is used to provide anchorage to move teeth and alter the direction of growth of the upper jaw in growing individuals. The design will be different depending on the direction of movement needed.
Instructions
- Wear your headgear as instructed (usually at least 14 hours each day). There is often no maximum number of hours and the more you wear it, the faster it works. The hours don’t have to be consecutive and if you use the chart provided, you can keep track of the hours you wear it. If you don’t wear your headgear enough, your treatment will likely take longer or will not achieve the correct bite.
- Remove your headgear at meal times and when playing sports or other rough activities. If you can eat light snacks with it on, it will be easier to get more hours. When a quick drink is needed a straw is a helpful tool.
- When your headgear is not being worn, keep it in the case provided so that it does not get lost or broken. Keep it in a safe spot in your house, so that it can easily be seen and not forgotten about (e.g.: a particular table, counter top or desk).
- Bring your headgear to every appointment so we can check it, particularly repair appointments.
- If your usual sleeping position is to curl up (head to chest), it is a good idea to tighten your headgear by one hole at bedtime to maintain good tension, as your headgear can become looser when you sleep curled up.
- If your headgear doesn’t fit properly between scheduled appointments, call our office. We’ll schedule an appointment to adjust it correctly. If you just wait until your next appointment, you may need to wear the headgear longer than you expected
- If your headgear has a cloth strap, the plastic parts can be removed so the cloth part can be put through the washer and let air dry.
Things you may notice
- At first and after any adjustment your headgear may cause your teeth to be sore to chew on. That’s because the teeth are moving, which is our goal. Usually the tenderness lasts only a few days. Not wearing your headgear regularly enough will only make the tenderness last longer.
- As your headgear moves your back teeth, the headgear wire may get closer to your braces on your front teeth (if you have them) or your front teeth. The headgear should not touch your front braces or teeth and requires adjusting if that happens
- If the outer wires press into your checks, they can be adjusted outwards (as long as you do not touch any of the wires that attach to the teeth), but take your headgear off to do this.
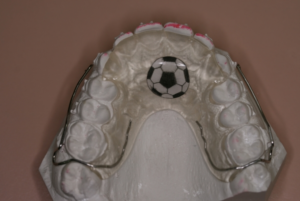
A biteshelf is removable like a retainer and is used to provide a temporary biting surface until a deep overbite or crossbite is corrected.
Instructions
- Initially, the biteshelf should always be in your mouth including meal-time and during sleep.
- As soon as you have finished eating, remove the biteshelf as instructed and carefully brush your teeth. Make sure that you clean the inside, outside and biting surfaces of all your teeth. After you have finished brushing your teeth, clean the biteshelf in this manner:
- Using the heavy duty brush we have given you, brush the exposed surfaces of the biteshelf
- Rinse thoroughly with cool water.
- Than carefully replace the biteshelf into position.
- Avoid flipping or playing with the biteshelf with your tongue. This annoys others and will quickly distort or break your biteshelf.
- The safest place for your biteshelf is in your mouth.
Don’t wrap it in a paper napkin or tissue. It may get thrown out.
Don’t put it in your pocket. You may break it or it may end up in the laundry and heat distorts the biteshelf.
Don’t just put it down. Even your dresser or in the washroom is not safe. Remember, it can get thrown out by mistake and dogs love the smell and taste of it.
Don’t put your biteshelf in hot water if it is dropped in an unsanitary place. It will warp. Wash it with soap and cool water.
Things you may notice
- Eating will be difficult at first since your back teeth do not touch. Be patient and eat soft foods and in a few days your teeth will get closer together and you will be able to chew harder things.
- The plastic taste, sometimes noticed with a new biteshelf, disappears in a day.
- With the biteshelf in place, your speech might be affected until you get used to it. Reading aloud to yourself can help you become more quickly accustomed to its presence.